 It’s official! I love making jam – there is something so cathartic about it – watching the processes that go into it. It can take a while to do but the results are well worth it! I started making jam in 2010 and haven’t looked back since 🙂
I’m going to do these posts as a series. So this is a basic intro to jam/jelly making and the tools and tricks I use year in and year out.
Terms
Jam: Jam is made with whole/chopped fruit which is cooked for a time in water to which sugar is then added. This means the fruit needs to be peeled/de-seeded or cored before cooking to ensure the jam is edible.
Jelly: Strained liquid made from cooking fruit in water – the strained liquid is then boiled with sugar to make a clear jelly. This way all parts of the fruit can be used, as they will be strained out at a later stage.
How to get started
Reading
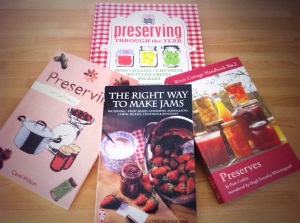
If you’ve never made jam or jelly before and you would like to do some reading I can recommend the books I use.
They are my ‘bibles’ for recipes, troubleshooting and more!
- ‘The Right Way to Make Jams’ – Cyril Grange: a great book from the 1980s which has some great tips and troubleshooting for if and when your jam goes wrong! Helped me a lot! You can get it from Amazon Marketplace for as little as 1p – bargain! 🙂
- ‘Preserves’ – Pan Corbin: part of the River Cottage Handbook range, this is a great book with so many different recipes, not just jams and jellies but chutney, drinks and more! Lots of inspiration. It is quite pricey on its own but I bought it as a bundle with the rest of the River Cottage Handbook set from The Book People for only £25.00 so worth shopping around.
- ‘Preserving’ – Carol Wilson: part of the self-sufficiency series this is another brilliant all-rounder collection of recipes and general information. I got it from The Book People on offer with the rest of the collection – great moneysaving!
- ‘Preserving through the Year’ – Oded Schwartz: a pretty comprehensive Dorling Kingsley book, with a wide range of interesting and some unusual recipes for use all year round, the book is even set out according to what is in season – kiwi jam anyone? 🙂 I got it from The Works so cheaper than Amazon!
Tools
I have never had much money for the jam-making side of things so have always tried to find my own ways of making it work – this has meant straining jelly though clean tights before! Haha!
But there are a few things you can’t do without.
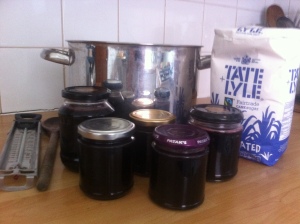
- The Pan – the essential component, it needs to be a good heavy bottomed aluminium pan – the best type to use is a Maslin pan – usually cost about £30 or more but you can definitely shop around – this is a nice wide pan which gives even heat while boiling the jam. I have never bought one though and use my all-encompassing-use-it-for-everything stock pot!
- The jars – you need something to put all that lovely jam into. You can spend hundreds on kilner jars or buy packs from somewhere like jamjarshop or you can keep all your condiment/ mayonnaise/sauce jars from throughout the year. One year I got a great collection by asking people at work to bring in their glass jars.
- Once you get them home all jars will need a good clean – hot, soapy water is brilliant. If you’re using second-hand jars and the labels just won’t come off – rubbing the labels with oil and then leaving them for a while before scrubbing does the trick – some chemical reaction happens between the glue and the oil. They will need a really good wash afterwards to remove the oily residue.
- If the jars still smell of curry paste or horseradish sauce (experience talking!) a spoonful of bicarb of soda given a good swirl with some hot water inside the jar should remove that odour.
- Sterilising – the jars will need to be sterilised before you can use them to pot your jam – I’ve heard you can do this in a dishwasher (lucky people!) but for me this constitutes washing in hot soapy water wash then placing them on a baking tray for easy transferal (make sure the jars don’t touch) and putting them in the oven on a low heat e.g. 100-120°C until they are dry – this also warms them up so when the hot jam is poured in they don’t crack.
- Lids – I always place a wax disk on top of my jam after pouring it into the containers, then use the lids – always check the lids are clean and not corroded – otherwise you can simply use plastic covers or you can buy replacement lids. If they don’t fit properly or are damaged your jam won’t be safe for consumption.
- The stirrer – I have one that’s older than me that is used for absolutely everything!
-
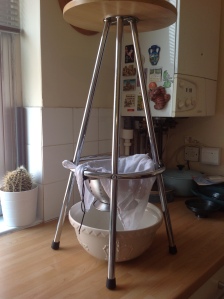
The strainer – if you make jelly you will need a way to strain it, as I said above I have used all sorts in the past – all poorly constructed from stuff lying around the house! One thing you will need is muslin cloth or even a pillow case to strain the liquid through. Just make sure it’s been boiled to remove bugs/impurities. I do this by pouring boiling water over the cloth before I start pouring the fruit in. It also ensures as much of the fruit liquid passes through as possible.
- You can get jam strainer set-ups from places like Lakeland but as you can see from my photo we have our own little set-up! 🙂 And it works brilliantly!
- Obviously – take it for granted but you need something to strain the liquid into as well! A nice bowl works perfect, when I’m scalding the muslin I make sure the bowl is underneath and that gets a good sterilisation at the same time, saving water and energy.
- The sugar – I use your bog-standard Tate and Lyle granulated sugar. There is jam sugar out there which has added pectin but truth be told I prefer natural pectin anyway so don’t bother – also the cost is much, much more for the jam sugar! I have however used other types of sugar before – made a lovely spiced plum and molasses jelly once when I ran out of granulated so really don’t be afraid to experiment!
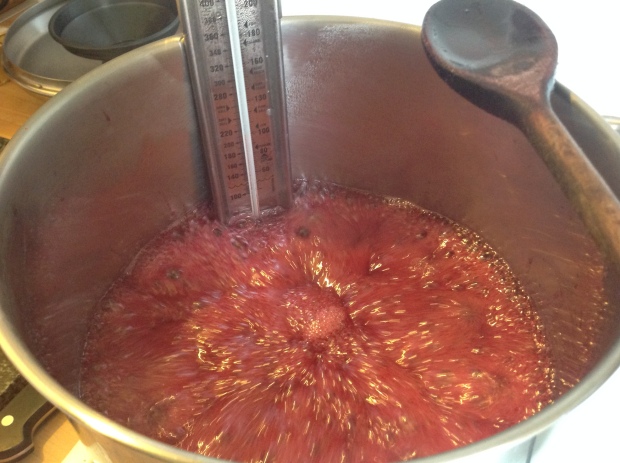
- Jam Thermometer/ Cold Plate – this is needed to check the jam/jelly has reached setting point. I only got a jam thermometer as a gift this last Christmas so got used to the plate technique, but it is handy to use them together – I never fully rely on the thermometer! To use the plate, it needs to be cold from the freezer so needs to be tucked away before you start adding the sugar to the recipe so it has time to get nice and cold! I’ll talk more about setting point below.
- The Jam funnel – a small luxury but a god-send for pouring jam into the jars without making an absolute mess of it! Just got one from Lakeland and it has changed my life!
Setting Point
This is the point at which the jam sets. Now having been a new ‘jammer’ recently I know that the temptation is to wait until the jam almost sets in the pan and then once it’s ladled into the jars it sets so hard it bends the spoon! (true story!) However the key thing to remember is that the jam continues to set once its in the jar and can even continue to set overnight.
So if it is still runny when you pour it into the jars – that’s not wrong! You’ll be able to eat it without smashing the jar open to get to it!
The jam thermometer way
Probably the easiest way – your jam thermometer will be able to tell you when you have reached setting point! 🙂 One it reaches the line, you are pretty certain your jam will set. Turn off the heat and can that jam!
The cold plate way
My favourite way, I am a newbie with a jam thermometer and still don’t trust it 100%! So I still use the cold plate method. As mentioned further up, the plate needs to be nice and chilled from the freezer.
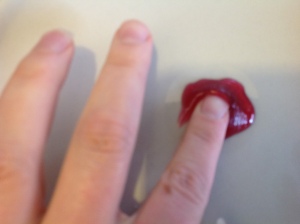
Once your gut tells you the jam is at setting point pour a little bit of jam on the cold plate, wait for a few minutes then run your finger through the jam, if your fingers creates ‘crinkles’ in the jam then it has reached setting point. I tried to take a picture to demonstrate but I’m terrible at multitasking!
A note about Pectin
I know that you can get pectin-enriched sugar and liquid pectin to add to jam recipes but my personal preference (borne out of cost initially but also as an additives worrier) is to use natural pectin.
If you are using low-pectin fruits like soft fruits e.g. strawberries then simply add some chopped apples to the recipe or some lemon juice (these have a high pectin content) – they should do the trick better than additives and if you’re foraging for apples then it’s free! 🙂
The basics
So how simple is a jam recipe – let me show you! Just a note, you might be tempted to make 6 kilos of jam in one go – the best way is slow and steady, most recipes won’t recommend using more than 2 kilos of fruit at a time!
Basic jam recipe
- Core/chop or de-stone your fruit and place in your pan.
- Add liquid – roughly 600ml per 1.8kg of fruit (chopped weight)
- Simmer on a steady heat for 1-1 1/2 hours
- Add an equal quantity of sugar to fruit (heat the sugar for a few minutes in the oven first) and stir in making sure all sugar is dissolved.
- Bring to the boil and keep on a rolling boil until setting point is reached.
- Jar and store
Basic jelly recipe
- roughly slice hard fruit like apples or pears, chuck in soft fruit like plums whole. Use the cores/stones as well as this is where the highest concentration of pectin is.
- Add liquid – roughly 600ml per 1.8kg of fruit (whole wight)
- Simmer on a steady heat for 1-1 1/2 hours
- Strain the liquid through muslin for a few hours or even overnight – don’t squeeze the bag to release the liquid or else the jelly will be cloudy.
- Return the liquid to the pan and heat up – add sugar – 450g of sugar for 600ml of liquid (heat the sugar for a few minutes in the oven first) and stir in making sure all sugar is dissolved.
- Bring to the boil and keep on a rolling boil until setting point is reached.
- Jar and store.
I hope this has been useful? Do you make jam? What’s your favourite flavour? Tell me what’s your flava?!! 🙂


Brilliant post. I love preserving fruit and veg to use in the winter months. So satisfying 🙂
LikeLike
thanks JB! 🙂
I am trying to get up the motivation to use some of the apples for stewed red cabbage for the freezer before they go off!!!! Lazy bank holiday 🙂
x
LikeLike
Do it !! 🙂 You will be glad you did during the winter months x
LikeLike
I know! I know! So lazy! And the kitchen is a mess!!! Haha! I WILL do it!!!! Will post up pics on twitter later to prove it 🙂
x
LikeLike
Will look forward to seeing them 🙂
LikeLiked by 1 person
Have you tried chutney ?
LikeLike